How To Use This Page
Audience
This page provides an overview of the basic steps to setting up your Cardinal Learn (Blackboard) online course. It is primarily aimed at instructors who are new to using Cardinal Learn (Blackboard) to teach online, but contains information on topics such as weighted grading that may be of use to more experienced online instructors, as well as those who are using Cardinal Learn (Blackboard) in a hybrid or in-person context.
Delivery Method
If you are teaching a fully online course, you should follow all of the steps. If your course is hybrid or in-person, certain steps might be more applicable than others, but you should still, at a bare minimum, follow all steps related to adding your syllabus to the course and setting up your grade center.
About the Steps
The steps are meant to be done in order. To access the content in each step, just click on the name of the step and it will be displayed in a text box. To hide the content, click on the name of the step again.
Each step contains sections, which are described below:
- The Notes section provides introductory information or tips related to the content of each Step.
- The Action Items are tasks that you are meant to complete in order to make progress in building out your Cardinal Learn (Blackboard) course.
- Additional Resources provides a variety of text-based and video resources that were curated to provide opportunities for you to learn more about the content touched on in each Step. Feel free to choose your own pathway with respect to exploring the Additional Resources. You may choose to review none of them, some of them, or all of them, according to your own needs and interests.
Alternative Formats
This guide is available as a Google doc and a PDF. Click on the links to access them.
Assistance
If you need help at any time, schedule a consultation by completing the CTE Service Request Form.
Terminology
The Catholic University of America's learning management system (LMS) may be referred to as Cardinal Learn or Blackboard interchangably throughout the text.
Steps
-
Step 1: Log Into Your Course
- Go to learn.cua.edu
- Enter your CUA username and password
-
Step 2: Familiarize Yourself With the Landing Page
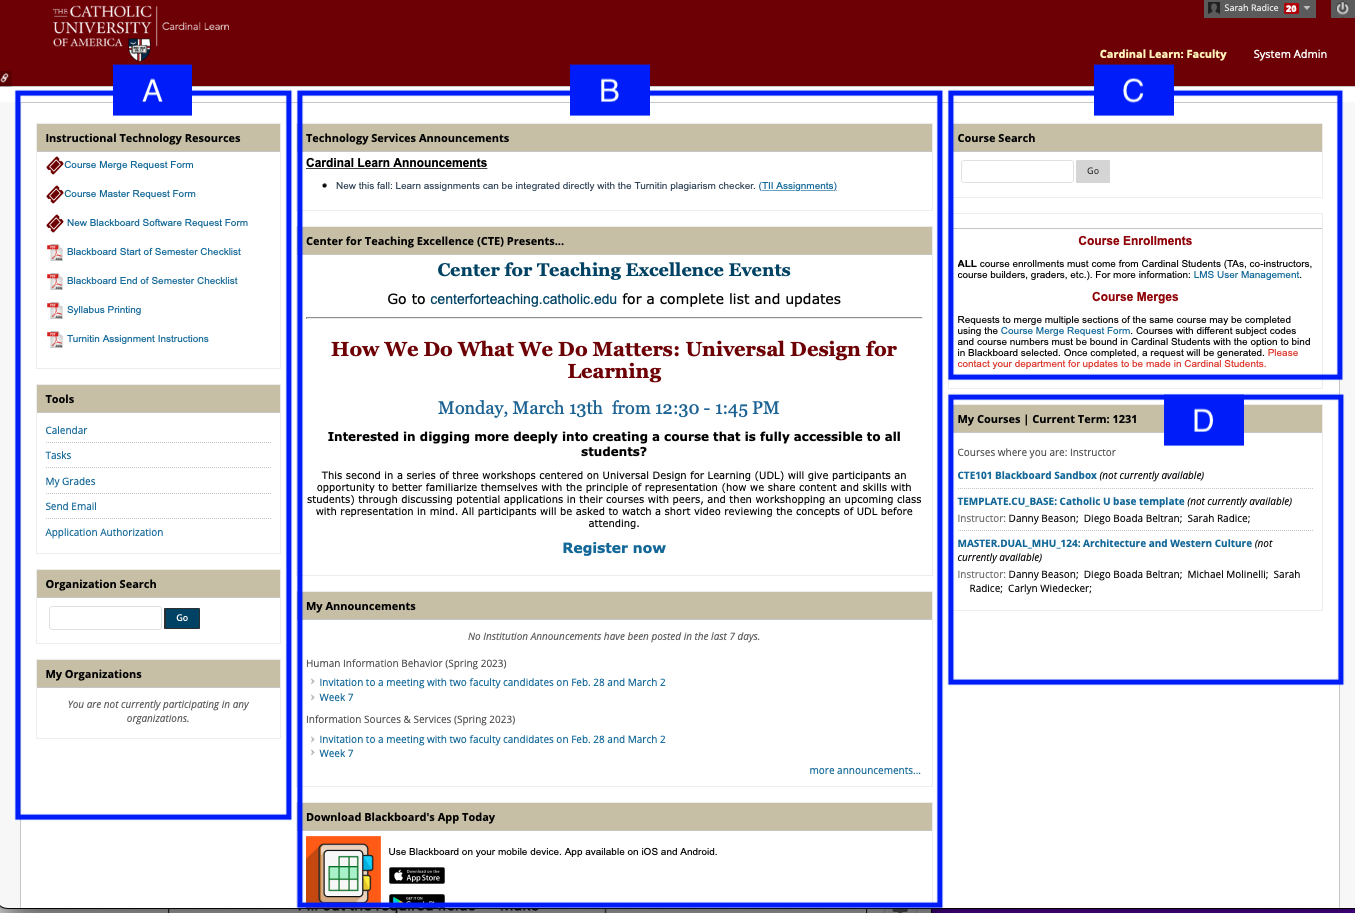
A. Instructional technology resources and tools. This is where you can submit a request for a course merge or master to be created, and find useful items like directions for how to print your syllabus.
B. Announcements from Technology Services, the Center for Teaching Excellence, and your courses, as well as the Blackboard app for download.
C. Search for courses here.
D. All courses in which you are an instructor. You can customize your visible courses by reading the handout Customizing the Course View in Cardinal Learn (Blackboard) or by watching the video Customizing Course View.
-
Step 3: The CUA Blackboard Template: Explore, Adjust, and Add an Always-on Zoom Link
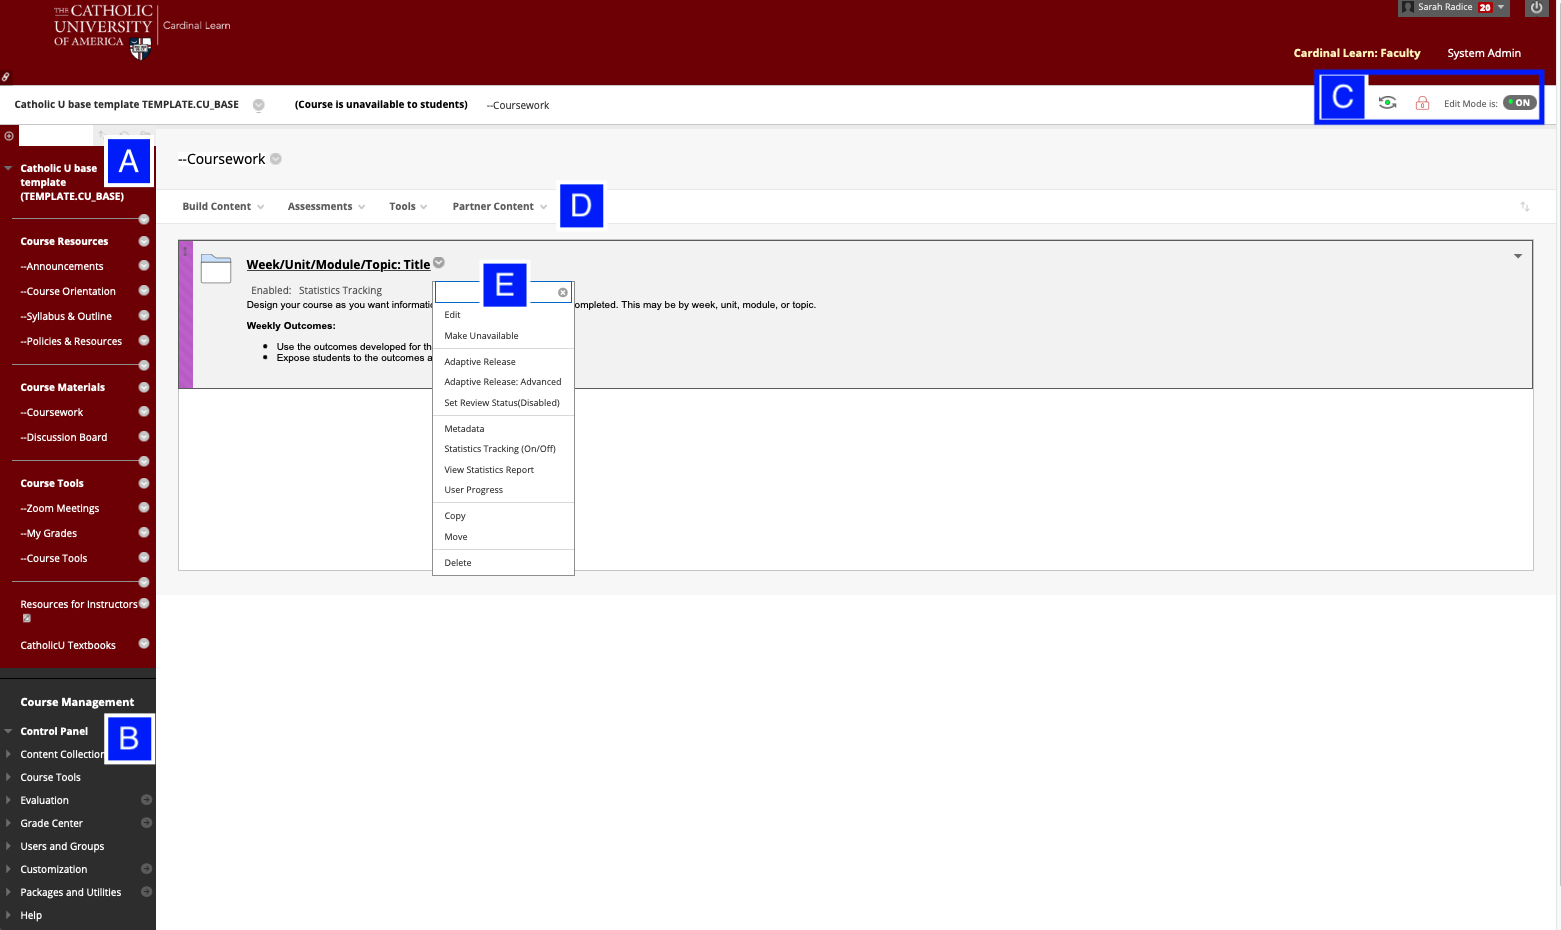
A. This is the Student Course Menu. Here, learners access course content. In the CUA template, the Course Menu should always be red with white text, and the Course Menu items pictured here should stay the same or be minimally changed to reflect the particularities of your course. Fidelity to the template should be maintained as much as possible in order to provide an accessible and consistent student experience.
B. This is the Course Management Control Menu. Here, instructors access various course management functions, such as the grade center. In the CUA template, it should always be dark gray with white text. Students don't see this menu.
C. This area contains useful instructor tools:
- Student Preview: Represented by an eyeball icon. By clicking on it, you can experience the course from a student's perspective.
- Course Availability: Represented by a lock icon. By clicking on it, you can make the course available (unlocked) or unavailable (locked) to students.
- Edit Mode: Represented by an on-off toggle. When Edit Mode is on, you have full access to all of the instructor functions. When Edit Mode is off, those functions are inaccessible.
D. This area contains menus, such as Build Content, Assessments, Tools, and Partner Content. Clicking on each menu will reveal a drop-down menu with various options.
E. If an item has a menu associated with it, there will generally be a small gray circle next to the title. The circle indicates the presence of a drop-down menu that you can reveal by clicking on it.
- In this example, clicking on the menu for the item Week/Unit/Module/Topic: Title reveals a menu with several options, such as Edit and Make Unavailable. The available options will change depending on the item type.
Zoom Link - Utility
Many instructors find it useful to insert an always-on Zoom link. When Zoom is linked within the course, you can use one link for all meetings and don't have to create or share more.
Zoom Link - Location
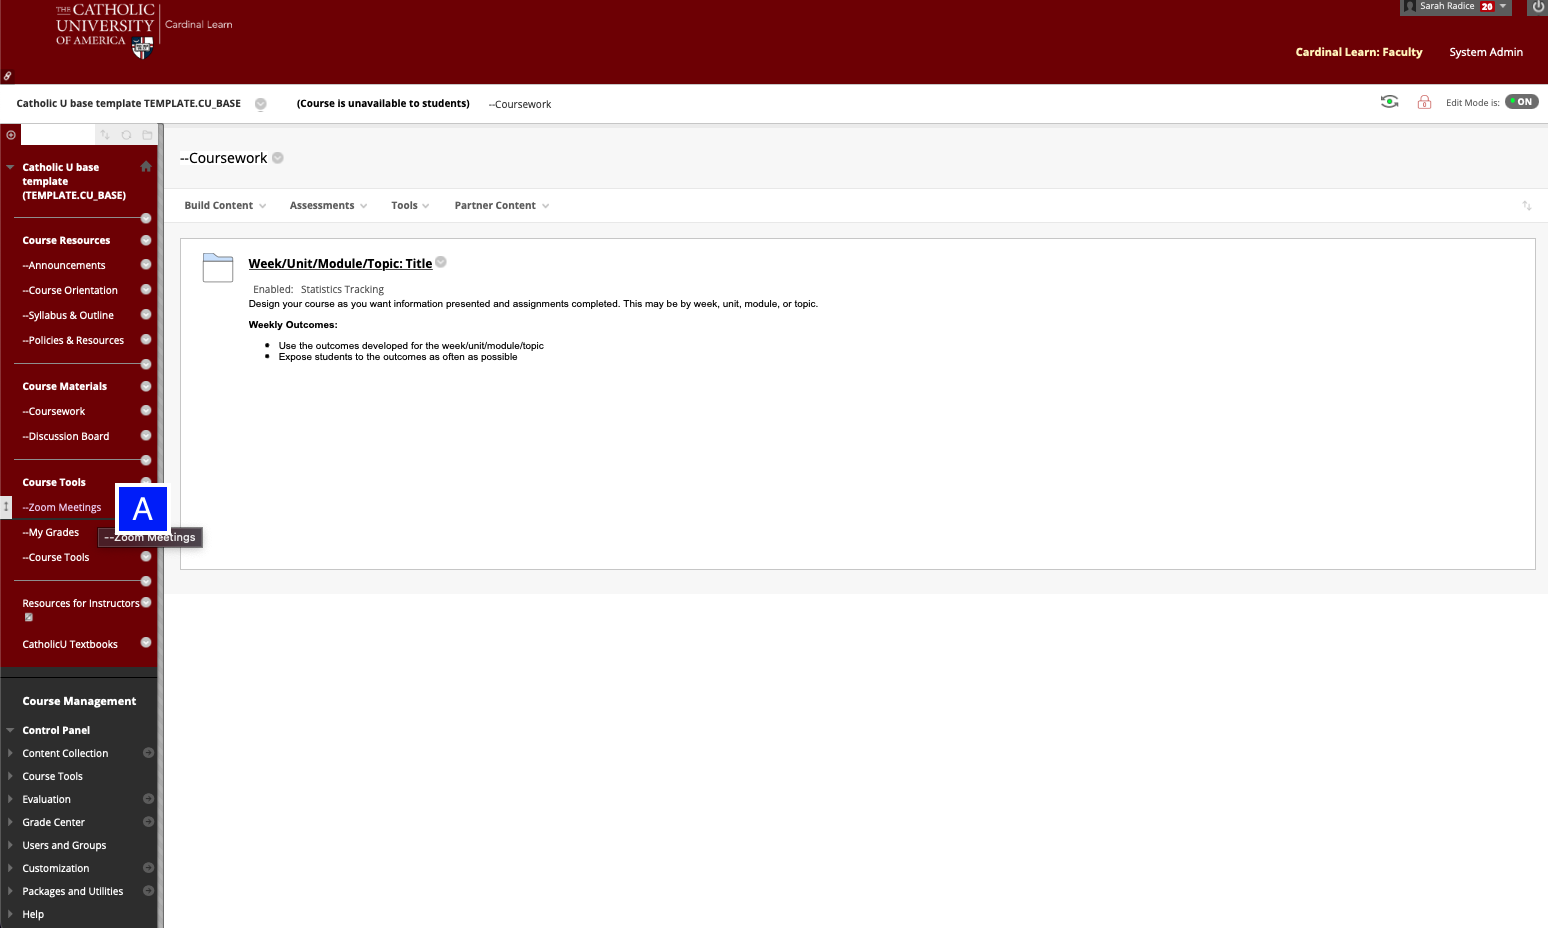
A. The Zoom Meetings menu item is located in the red Student Course Menu. Click on it to launch Zoom.
Zoom Link - Creation
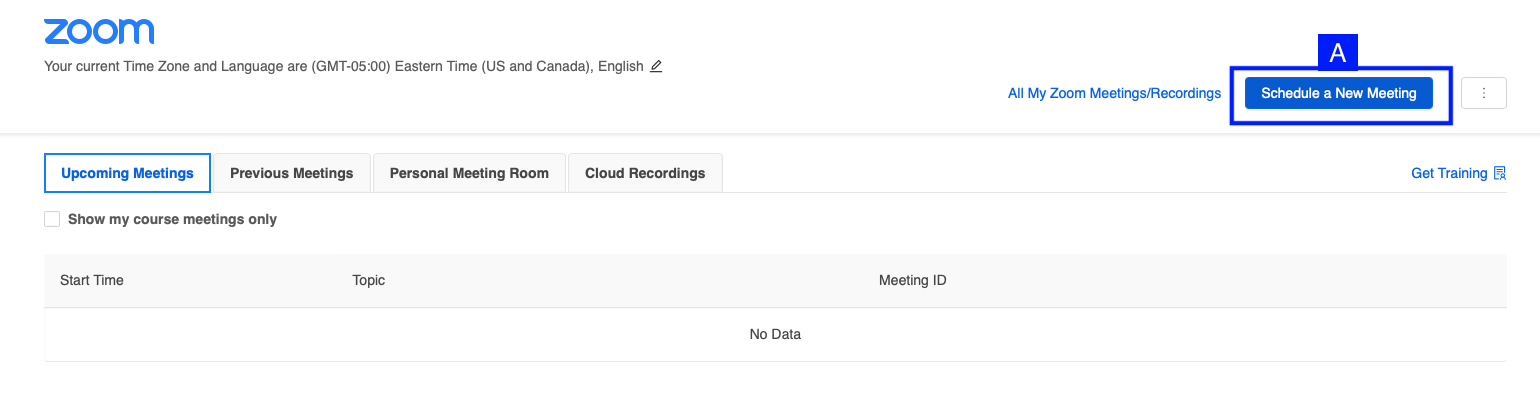
A. Click on the blue Schedule a New Meeting button after Zoom launches and customize your meeting settings.
To create an always-on link, follow these steps:
- Go to time zone
- Select recurring meeting
- Set the recurrence to no fixed time
- Save
Action Items
- Read Navigate Inside a Course.
- Set up your always-on Zoom link.
- If you need help, schedule a consultation by completing the CTE Service Request Form.
Additional Resources
- Cardinal Learn (Blackboard) Template handout
- Blackboard Walkthrough video
- Cardinal Learn (Blackboard) Course Organization Standards handout
- Zoom Scheduling handout
-
Step 4: Upload Your Syllabus, Welcome Message and Initial Announcements
Notes
Putting your syllabus in Blackboard is a CUA requirement, regardless of the format of the course you are teaching or how much you plan on using Blackboard. You can build the syllabus in Blackboard using the provided template, or import your own. The syllabus should "live" in the student course menu section called Syllabus & Outline, although you can have it linked in additional locations as well.
Action Items
- Review the following resources:
- To build your syllabus in Blackboad using the provided template, follow these steps:
- Go to the red Student Course Menu
- Select Syllabus & Outline
- Scroll down to the syllabus template
- Click the gray drop-down menu
- Edit
- Fill out the template
- Submit
- To upload a pre-made syllabus, follow these steps:
- Go to the red Student Course Menu
- Select Syllabus & Outline
- Select the Build Content menu
- Select Item
- Attach the file and/or provide the link
- Create a welcome message
- A welcome message would typically go in the first module of the course, or in the Announcements section
- Create an announcement as described below, or navigate to where you want the welcome message to go, and then follow these steps:
- Select Build Content
- Select Create
- Select Item for text and/or a video link
- Select Panopto video embed if you have recorded a welcome message video in Panopto
- Submit
- Create announcements
- The most direct way to add an announcement is to select Announcements in the red student course menu, then Create
- You can also create announcements by using the gray Course Management Menu
- Select Course Tools
- Select Announcements
- Select Create Announcement
- Write your announcement and include attachments and links
- Submit
- Need help?
- If you need help, schedule a consultation by completing the CTE Service Request Form.
Additional Resources
- Syllabus creation
- Syllabus Template video
- Crafting a Syllabus handout
- Welcoming students to the course
- Scripting a Welcome Video handout
- Course Orientation Questions handout
- Establishing a Positive Online Classroom Climate handout
- Content creation
- Building Content in Cardinal Learn video
- Cardinal Learn Content Collection video
- Adding Course Content handout
-
Step 5 Set up Your Grade Center
Notes
Regardless of the format of the course (online, in-person or hybrid), or how much you intend to use Blackboard for content delivery, all instructors should use Blackboard's Grade Center as the central repository for all graded student work. The Grade Center provides a number of benefits for both students and instructors.
Benefits:
- Students and instructors can find grades and feedback in one central location.
- Students and instructors can measure progress in the course in real time.
- Students and instructors have have an electronic record of all work submitted.
In short, using Blackboard's Grade Center provides clarity, consistency, structure, and security to the management and storage of student work and assessments, for both students and instructors.
Action Items
- Read CTE - Cardinal Learn (Blackboard) Grade Center Setup, which guides a hypothetical instructor step-by-step through setting up their grade center, and provides a checklist for you to use in setting up your own Grade Center.
- Set up your own Grade Center to reflect what you have described in your syllabus.
- If you need help, schedule a consultation by completing the CTE Service Request Form.
Additional Resources
-
Step 6: Create Folders According to CTE’s Suggested Course Organization Standards
Notes
What is a logical structure for your course? For many instructors, weekly modules make sense. For others, it may make sense to organize around themes or projects. You may have already described the structure in your syllabus, in which case you just need to make sure you set up your Blackboard course to align with it.
Regardless of delivery method (in-person, hybrid or online), it's important for instructors to organize their content in Blackboard in a logical manner that makes content easy to find for students. This creates an engaging and stress-free user experience for them, and makes it easier for them to complete their coursework.
Action Items
- Read the Cardinal Learn (Blackboard) Course Organization Standards handout.
- Decide on your course organization structure, if you haven't already done so.
- Create your folders and fill out the external view information for all folders, as per the handout.
- If you need help, schedule a consultation by completing the CTE Service Request Form.
Additional Resources
- Not sure how to make a folder?
- Go to the red student course menu
- Select Coursework
- Select Build Content
- Select Content folder
- Give it a name
- Add the suggested external folder information from the handout to the big text box
- Submit
-
Step 7: Build Out Course Content Inside of Folders
Notes
Now that you have created your system of folders and filled out the external folder information for each of them, it's time to put content inside of each folder. It's okay to not have 100% of your course content added to your folders before the course goes live, but you should aim to have a substantial amount of it online, even if it's hidden from students at first. Please note that although we provide content examples in the Cardinal Learn (Blackboard) Course Organization Standards handout, we are not telling you what kinds of content you should include, but rather providing examples of what you might do.
Action Items
- Review Cardinal Learn (Blackboard) Course Organization Standards handout.
- Add content to your folders.
- If you need help, schedule a consultation by completing the CTE Service Request Form.
Additional Resources
- Want another way to think about organizing your content?
- Review these handouts: Course Delivery Organizer Outline and Course Delivery Organizer - Table.
- Not sure what kind of content you can make in Blackboard?
- Start by reviewing Types of Course Content.
- Not sure how to create content?
- Start by reviewing Create Content and the Adding Course Content handout.
- Want to know a whole lot more about content?
- Start by reviewing Course Content.
- Not sure how to put content INSIDE a folder?
- Go to Coursework (where you built the folders)
- Enter the folder by clicking on the folder name
- Use the drop-down menus (Build Content, Assessments, Tools, Partner Content) to add specific types of content
- Want to move existing items into a folder?
- Go to Coursework
- Navigate to where the item is that you want to move
- Select the gray, circular drop-down menu icon next to the item's name
- Select Move
- Select the Destination Course and Destination Folder
- Use the Browse button to open a pop-up window that will let you choose the Destination Folder
- Submit
- Want to link to existing content somewhere else in your course?
- Go to Coursework
- Navigate to exactly where you want to put the course link
- Select Build Content
- From the drop-down menu, under the Create column, select Course Link
- In the Choose Item field, select the Browse button and then the item you want to link to
- Fill out the Name and Location fields
- Submit
- For more information about specific types of content, check out these resources:
- Assignments
- Creating Assignments handout
- Tests, pools, polls and surveys
- Surveys handout
- Tests, Pools and Surveys
- Creating Tests in Cardinal Learn video
- Rubrics video
- Rubrics
- Creating Tests, Surveys and Polls video
- Journals, wikis and blogs
- Journals, Wikis and Blogs handout
- Journals
- Wikis
- Blogs
- Discussion boards
- Assignments
-
Step 8: Familiarize Yourself With How Grading Works
Notes
Now that all other elements of your course have been set up, it's time to make sure you know how to use the Grade Center.
Action Items
- Review Navigate Grading for a great overview of the Grade Center and its features (or Blackboard Grade Center if you prefer video).
- If you need help, schedule a consultation by completing the CTE Service Request Form.
Additional Resources
- Want to deep dive into how calculated columns work?
- Check out Calculate Grades
- Want to know how to grade specific kinds of content?
- Want to try out Student Preview Mode?
- If you want to see how to grade something, or practice grading something, you can enter Student Preview Mode after you make the gradable item, take it as a student, exit Student Preview Mode, and then try grading yourself as an instructor.
- Note: In order to save the work you do as a student, so you can interact with it as an instructor, you have to elect to keep the preview user and all data. For directions about how to do this, as well as how to delete the preview user and all data, go to Student Preview and read the section called "Exit and Delete Your Preview User Account."
- If you want to see how to grade something, or practice grading something, you can enter Student Preview Mode after you make the gradable item, take it as a student, exit Student Preview Mode, and then try grading yourself as an instructor.
-
Refine Your Course and Explore More Advanced Features When You're Ready
Notes
Use the curated list of resources below to explore opportunities to deepen and refine your practice as an instructor of online learning.
Need Help?
- Schedule a consultation by completing the CTE Service Request Form.
Assessment
Learn about useful but under-utilized Blackboard and Panopto tools.
- Retention Center handout
- Grading Schemas handout
- Using Panopto Quizzes video
Future Planning
Knowing how to copy your course will save you work in the future.
- Course Copy handout
Video
Deepen your knowledge of incorporating videos into your course, particularly with respect to Panopto’s tools and features
- Creating Asynchronous Videos handout
- Panopto Overview video
- Recording With Panopto Capture video
- Editing Videos in Panopto video
- Using Panopto Folders video
- Using Panopto Quizzes video
Customization and Differentiation
Create groups and rules around when students can access particular content.
- Adaptive Release
- Groups video
Quality Review Program
The Center for Teaching Excellence has recently launched the Quality Review Program (QRP). Instructors can engage with the QRP by using the standards of the Quality Review Tool for individual reflection, informal guided review working with an instructional designer, or formal guided review working with an instructional designer culminating in a course quality designation.